


It’s that time of year again: time to sadly swap your gorgeous autumn wardrobe for thick stockings, gloves and a snug winter coat. But don’t mourn the changing seasons too hard, because as the mercury goes down, your nail art options just continue to go up, up up!
Winter is the perfect season to rock moody mauves, vampy purples and gloriously bold blues. It’s also a great time to try your hand at some simple and easy nail art.While the warmer months are all about delicate pastels and gentle transitions, winter nail art can afford to be edgy, messy and imprecise.
So, if you’re looking for a quick and easy manicure that is forgiving on newbies but still looks fab, why not try out our simple no sponge winter gradient nail art tutorial using OPI nail polish?
Let’s get started!

You Will Need:
An Old Makeup Brush or Fanned Nail Art Brush
Aluminium Foil or Similar Mixing Surface
Nail Polish Remover/Acetone
Step 1:
As with any manicure, you’ll get the best results by giving yourself the smoothest canvas to work with. Start by washing any natural oils from your nail beds then drying your hands thoroughly. Then, apply a coat of OPI’s Natural Nail Base Coat.
It’s important that you wait for this layer to dry before proceeding to step 2, especially when using dark colours that may otherwise stain your natural nails.
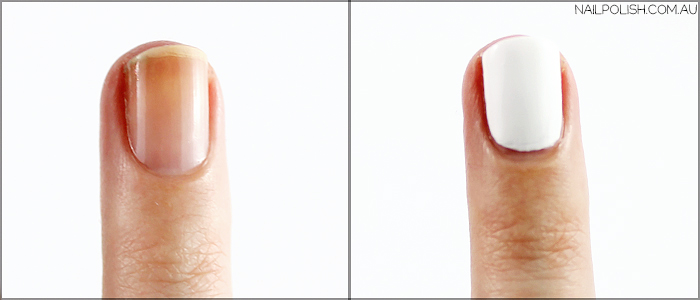
Step 2:
Once your protective base coat is dry, it’s time to give your gradient nail art a solid background colour. We’ve chosen OPI’s Alpine Snow. It will help to provide a vivid, uniform base for the blue gradient we’re going to build up next. Don’t be afraid to apply two coats to reach full opacity, but wait for each layer to dry first.
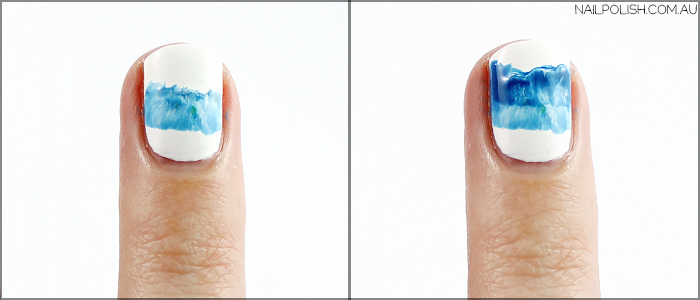
Step 3:
While you’re waiting for your white nail polish base to dry, you can prepare your tools. Instead of using a makeup sponge (as many gradient tutorials do), we’re going to use an old makeup brush for easier blending. You could also use a fanned nail art brush.
Set up a palette for mixing your colours. You can use a nail polish palette if you’ve got one, but a disposable plastic lid or a sheet of aluminium foil/alfoil will work just as well!
Pour a few generous drops of your top coat onto your palette. Next, do the same with a few drops of your main colour, China Glaze’s Aqua Baby. Combine the two using your brush until you have a translucent blue. It’s important that the colour contains more top coat than polish as you want it to be semi-transparent for layering.
Next, use your make up brush to dab the nail polish onto your nail, about a centimetre from the base.Using a zig-zagging motion will give your gradient a fuzzier, less abrupt transition.
Step 4:
Clean off your make up brush in acetone between steps, then once again combine your OPI Top Coat with China Glaze Aqua Baby. This time, use a few more drops of the blue colour to intensify the colour. Pat it onto your nail, just overlapping your first colour. You’re getting the hang of this,right
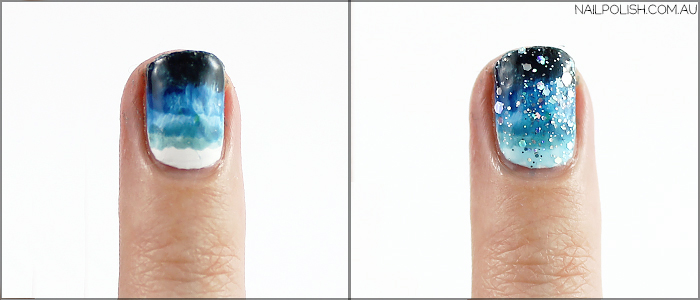
Step 5:
Now it’s time to combine your existing mix of China Glaze Aqua Baby and top coat with a single generous drop of OPI’s Black Onyx. This will provide the darkest colour and finish our gradient. Apply it to the tips of your nails until it meets the medium blue shade.
Step 6:
If you’re satisfied with your gradient, you can stop here. However, we’ve got a little trick that’ll help you hide any imperfections. Simply top coat your nails with a chunky glitter polish set in a clear or blue base, like China Glaze Techno. This will really bring your gradient together and smooth everything out. Also, it totally screams winter, right?
Step 7:
Finally, it’s time to add your OPI Natural Nail Top Coat. This should also serve to merge any rough transitions and leave you with a flawless finish. And you’re done!

There you have it, easy gradient nail art that’ll help you beat the winter blues in no time!
Stay Polished,
The NailPolish.com.au Team.